I tried one of those headlamp polishing kits on my 2001 Tahoe after I bought it. A couple years later the headlamps were even worse than before I applied the kit. I’ve used a handful of those kits all with subpar results. At this point I decided to come up with my own process to restore plastic headlamps. Read further if you’re interested…
Issues with plastic headlamps
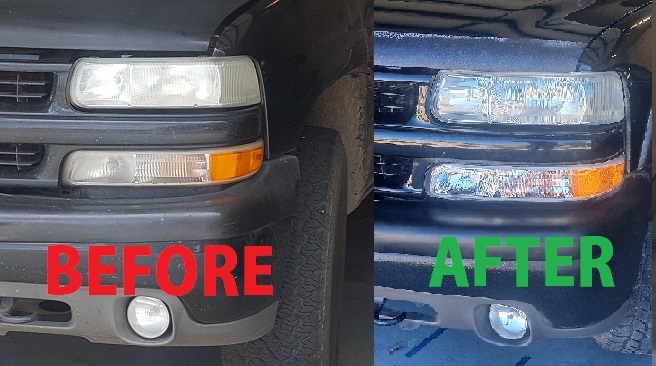
Modern plastic headlamps become oxidized over time. This is especially pronounced where I live in the desert. They become hazy making it hard to see the road at night.
The old glass headlamps were not susceptible to this but we’re stuck with plastic fantastic headlamps since around the year 2000 when most all automotive manufacturers switched to plastic lenses. Now almost all those headlamps are completely oxidized. Additionally, some may no longer be available for purchase!
I painted my truck using a two stage system of color and clear. After painting the truck I followed up with a ceramic (glass) coating. In the process I learned a lot about high quality coatings.
Issue with headlamp restoration kits
The headlamp restoration kits have poor quality materials designed for people with no autobody experience.
All the kits I’ve used in the past come with one or two stages of sand paper and perhaps a polish.
The included sealer if of good quality (likely not) is applied with a brush. It leaves the headlamps rough and lumpy looking.
If you’re in a bind, the old toothpaste polishing trick using a drill mounted polisher is time better spent. Then polish the lens with WD-40 or other silicon spray grease.
Otherwise, you’re better off buying new lenses then using an off the shelf restoration kit.
The goal of this project is to make tired old headlamps outlast OEM headlamps straight out of factory. While restoring original quality.
2k Urethane Clear Coat
Modern urethane clear coats utilize an activator. Once mixed the paint must be used within a set amount of time before it fully catalyzes (sets up). This system is referred to as a 2K Clear Coat. It creates a strong UV resistant and transparent coating. Much stronger than the alternative coatings without any activator. The downside is 2k coatings are expensive. It cost me around $250 / quart for a middle of the range clear coat when painting my truck.
I was able to find a 2k clear coat system that comes in an aerosol can! It’s more expensive per unit volume but can buy in a much smaller quantity and doesn’t require a spray gun. There’s a activator in the spray can you break via a pin and mix up. It’s really slick system.
PART 1: Remove oxidation from lenses
ALL oxidation has to be removed from the lenses. You do this by sanding the outside.
I have an auto body sanding block. If you don’t have one you can use a sponge. You wrap the sandpaper around it and sand until the ENTIRE surface is of the same texture / consistency. I sanded as follows; 240, 320, 400, 600, and lastly 800 Grit.
It’s important you read your clear coat’s instructions for what the final grit should be. Some paints may require a rougher surface. For instance when I painted my truck it called for 600 grit surface. Where as the 2k Clear Coat from Spray Max called for a 800 grit.

Note: I goofed on my fog lamps. I forgot to pull them off and prep them with the other lenses. So I rushed to do it. I didn’t get all the oxidation sanded off before painting them. Once paint was applied you could see some oxidation damage sealed into them. I doubt you can see it in the photo but it’s visible upon close inspection (arms length).
PART 2: Prep lenses for clear coat
Clean the lenses AFTER you’ve sanded the ENTIRE surface of your lens AND it’s all the same consistency. There should be NO lips or ridges (visible or otherwise) left in the surface. I took a flashlight and inspected CLOSELY prior to moving on.
CLEANING: clean the surface with dish soap, followed by a solvent like grease and wax remover, and lastly blow it off with shop air. I went over the surface multiple times with solvent, and a lint free towel before blowing them off.
DO NOT TOUCH LENSES WITH YOUR BARE HANDS! I HAVE ON A NEW SET OF RUBBER SHOP GLOVES TO AVOID CONTAMINATING THEM WITH GREASE.
SAFETY EQUIPMENT: put on a paint respirator. You breath through a carbon canister which pulls the paint solvents out of the air your inhaling. I went to the army surplus and bought a military gas mask. You can change the carbon canister on these unlike the once use paint respirators from the paint store.
ADHESION PROMOTER: This is where most people go wrong. They forget the plastic adhesion promoter. Plastic doesn’t bond well with paint, don’t ask me why, perhaps something to do with them not flowing together (the lens would already be catalyzed). You’re going to follow instructions on the adhesion promoter. I bought mine at the auto parts store. It’s sold next to the spray paint. I did three light coats waiting no more than 3 minutes between each.

PART 3: Apply clear coat
Do not skimp on the clear coat! Make sure it’s 2k and it’s a quality brand. I also needs to be gloss finish.
You want to get the clear coat on quickly after applying adhesion promoter (mine said within 10 minutes). At this point I followed instructions on my 2k Clear Coat to mix the can.
First coat: The first coat is just to create a bonding surface. I applied a light coat.
Test if ready for next coat: I picked a spot on the lens that wasn’t noticeable. There I could touch to see if the paint was dry. Go back and see if the paint is still tacky. If it’s just barely tacky then it’s time to apply the next coat.
Second Coat: for the second coat I’m looking to get consistent coverage. I wanted to make sure I covered the entire surface with a thin film. It’s much more than first coat but not overly saturated.
Last Coat: once you’ve established the paint is ready (touch test), apply the last coat. Automotive painters say the best paint job is one continuous run. This time you’re going to lay the paint on THICK but consistent. You want to SATURATE the whole surface.

Getting the paint right comes down to spraying experience. You’ll want to avoid getting overspray (creates a rough less transparent surface) and rather pushing that paint into the lens itself.
You’ll also want to be careful of runs, drips, solvent pop, and bare spots. I laid my lenses as flat as possible to avoid runs, yet have chance to apply THICK coats. Solvent pop is when you don’t allow the previous coat to dry enough. The solvents push through the subsequent coat. That’s your touch test.
It wouldn’t hurt if you have some other spray projects to practice on those before doing this as the clear coat and adhesion promoter ran me about $50 not to mention various sandpapers.
PART 4: Let it dry
You’ll want to wait a good day before reinstalling your headlamps.
There are solvents in the paint which transport it through the air to the surface and allow it to flow out evenly.
Over time these solvents dry / flash off. It can take a good month to get them mostly dried out and years after that they still slowly leave the paint.
BONUS: Create a lifelong lens
After a month your headlamps will be mostly cured. At this point you can apply additional coatings.
I plan to do that and perfect the surface. We’ll start by what painters refer to as color sanding which perfects the surface of the paint.
Sand the lens: sand the lens with 1000 followed by 1500 grit sandpaper. Ensure surface is consistent before moving onto next grit.
Polish the lens: now we will use heavy cut, medium cut, fine cut, and lastly machine polish to perfect the surface. Ensure the surface is consistent before moving onto next polish.
Clean the headlamp: clean the headlamp with dish soap followed by grease & wax remover. Lastly blow it off with compressed air.
DO NOT TOUCH LENSES WITH YOUR BARE HANDS! I HAVE ON A NEW SET OF RUBBER SHOP GLOVES TO AVOID CONTAMINATING THEM WITH GREASE.
Apply ceramic coating: follow instructions in your ceramic coating kit to apply a ceramic coat to the lenses.
This will better seal the lens from oxidation process. In short it should last much longer now! It conceivable you could have a lifelong lens should you apply the ceramic coat to these every couple years.

Conclusion
If you are only doing a couple lenses this might not pay for itself unless they are expensive lenses. The 2k clear coat is fairly spendy, approx. $50 for it and adhesion promoter. Otherwise, it maybe worth retaining original factory lenses as sometimes the aftermarket ones don’t fit as well.
The spray can I bought lasted for three coats on the ten lenses. There was a bit left over. I could have possibly done another lens, maybe two. I’ve yet to do the bonus steps which will effectively seal the headlamps from oxidation.
Feel free to reach out to me if you have any questions. I’d love to help out! Can you tell which lenses were brand new in image above versus the ones I restored?